Tuesday, January 31, 2012

Ribollita

I have to get something off my back before I dive into this post, I didn't pour a glass of wine until I was smelling the deliciousness of garlic cooking in olive oil.  Now that I have that out of the way, I can also proudly admit that this recipe is another favorite from Runner's World (see Red Velvet cupcakes...I think they are on here).  As with most recipes, I used the actual recipe as a guideline and altered where I saw fit and it seemed to work for me.  Of course, you can't go wrong when trying a recipe from a Chef!

Had to add this...Chef Matt Connors, a nine-time marathoner with a 3:05 PR, prepares a hearty prerace Tuscan soup. By Matt Connors Image by Yunhee Kim From the December 2008 issue of Runner's World.

Ribollita

Italians make ribollita, which means "reboiled," from leftovers and cook the soup twice before eating. Make it with whatever light-colored beans you have on hand.

2 cups cannellini (or any white bean), drained and rinsed
1/2 cup extra-virgin olive oil
1 tablespoon fresh garlic, chopped
1 tablespoon fresh rosemary, chopped
1 large onion, chopped
1 carrot, peeled and chopped
1 large Yukon gold potato, diced
2 celery ribs, chopped
1 bunch kale, chopped roughly
1 cup canned tomatoes, chopped
2 cups chicken stock
3 slices day-old, crusty white country bread
Grated Parmigiano-Reggiano (optional)


Mash one-cup cannellini beans in a bowl with the back of a fork until smooth. Set aside.

Gently cook garlic, rosemary, onions, celery, carrot, and kale in the olive oil for about 20 minutes in a heavy-bottomed soup pot, stirring occasionally. Add both mashed and whole cannellini beans, chicken stock, potato, and tomatoes.

Simmer gently for at least one hour. Add bread and simmer until it's completely dissolved into the soup. Taste.

Adjust seasoning with salt and pepper.

Serve (preferably the next day), drizzled with olive oil and Parmesan. Makes four generous servings.


And here is what I did...
- Instead of cannellini beans, I used Northern, they are white.  I also used both cans in their entirety because it seemed wasteful not to. Unless you picture yourself using them on a salad or in another form, be bold and use both cans.
- Instead of fresh rosemary, I bought it in a jar, but that is just because the grocery store was out of fresh
- Can someone please define "large potato?" I used two normal sized looking potatoes
- 2 celery  = 3 in my book because what am I going to do with all this celery? In my honest opinion, no one actually eats celery because they like it, they eat it because they are pretending they are eating real food.  In soup, celery is 100% ok...it is also amazing with PB, which is probably how I will have to eat it so as not to waste it.
- Back on track...1 bunch kale is a lot of kale, but know that, like spinach, it shrinks [insert joke here].
- I used vegetable stock instead of chicken and still loved this recipe.
- What is with the bread? I felt weird about that, so I dismissed that step.
- Finally, if you feel so inclined to beef up this soup, pun intended, I added cooked, ground turkey and liked the added heavy.  It also helped the soup go a little further.
- One more thing, I had a green pepper that was looking too creepy to add to a salad, but I saved it to chop and add to the soup and it worked.  Look in your fridge and throw in those weird looking veggies instead of tossing them.  This can certainly be used as a bottomless pot stew.

Enjoy..and happy running!

Thursday, January 12, 2012

Smashed White Bean and Avocado Club

Let's get one thing straight, "Smashed White Bean" in my book is store bought hummus.  I also don't have a food processor, so there was no way I was about to smash beans with a fork.  Also, I do know that hummus is generally made with chick peas, which seemed like a fair enough substitute.  So here goes, let's make a sandwich.

Ingredients

  • 2 15-ounce cans white beans, rinsed and drained
  • 2 tablespoons extra-virgin olive oil
  • 1/2 teaspoon kosher salt
  • 1/4 teaspoon black pepper
  • 12 slices multi grain bread
  • 1 small red onion, thinly sliced
  • 1 cucumber, preferably hothouse (seedless), thinly sliced (peeled, if desired)
  • 1 4- to 5-ounce container sprouts (such as alfalfa, radish, broccoli, or a combination)
  • 2 avocados, pitted and thinly sliced

Directions

  1. In a medium bowl, combine the beans, oil, salt, and pepper. Roughly mash the mixture with the back of a fork.
  2. Place 8 of the bread slices on a work surface. Divide the mashed beans among them. Top with the onion, cucumber, sprouts, and avocado.
  3. Stack the open-faced sandwiches on top of one another, avocado-side up, to make 4 double-decker sandwiches. Top with the remaining 4 slices of bread.
  4. Slice each sandwich in half, if desired, and serve.
Like I said, I bought hummus, but if you want to smash beans, have at it.  I also used a gluten free wrap instead of bread, but again, cleanse.  I didn't use onion because I don't like them raw.

Another variation that was even more delicious, was a little home brew.  I smashed a whole avocado, shaved half a cucumber into it, added salt and pepper, a dash of white pepper for a little kick and probably a teaspoon of dill - I just shook a for a bit until the amount seemed good. Toast gluten free bread, which is as dry as it sounds, spread a small amount of the avocado mixture, just enough to hold down a piece of romaine (I suppose you could use iceberg, butter or any other lettuce), then top with half the avocado mixture - this is enough for two open faced sandwiches and it was super yummy. 

Many thanks to Real Simple again for this concoction.

Linguine with asparagus and pine nuts


Ingredients

  • 12 ounces linguine (3/4 box)
  • 1/4 cup olive oil
  • 1/4 cup pine nuts
  • 4 cloves garlic, sliced
  • 2 pounds asparagus, trimmed and cut into 1-inch pieces
  • kosher salt and black pepper
  • 1 cup shaved Parmesan (about 3 ounces)

Directions

  1. Cook the pasta according to the package directions; drain the pasta and return it to the pot.
  2. Meanwhile, heat the oil in a medium skillet over medium heat. Add the pine nuts and garlic and cook, stirring frequently, until golden, 1 to 2 minutes. Add the asparagus and cook, tossing occasionally, until just tender, 2 to 3 minutes.
  3. Add the asparagus mixture to the pasta along with 1 teaspoon salt and ¼ teaspoon pepper and toss to combine. Sprinkle with the Parmesan before serving.
And here are my notes...I used gluten free pasta because of the cleanse, but will make this again using whole wheat pasta.  I also made this twice, the first with asparagus, the second with green beans, but I think I would use whatever is on sale, like broccoli, spinach, etc.  I also didn't top with shaved Parmesan because of the cleanse, but again, would use it when I make it again off the cleanse. Oh, I almost forgot, this is a Real Simple recipe, April 2010. I really love Real Simple.

The Cleanse

I can't believe it has been since June, that is horrible, but back on track, in more ways than one.  I started 2012 with a bang to my system - no caffeine, no alcohol (as if these two weren't bad enough), no animal products and no gluten.  I feel like there were other things, but I also view cheese as a food group.  This is the Quantum Wellness 21-Day Cleanse.  I am shocked to say this, but I am really enjoying the cleanse, a lot.  After the first couple days without my morning coffee, my body figured out that it wasn't getting coffee and stopped the headaches.  I have learned how to eat better to feel better and can see some of the practices sticking, but not coffee, maybe less, but my morning coffee while getting ready in the morning is a simple pleasure...plus, I am kind of sick of feeling tired, but that may also be a protein shortage.  I have been eating different foods, eating really healthy, working out, losing weight and trying new recipes.  Below are a few that I have enjoyed, including alterations to fit them into the cleanse.  Here are a few of my favorites...

Wednesday, June 15, 2011

Strawberry Summer Cake

I made this cake at night and took it to work in the morning and it was delicious for breakfast...and since it has fruit, it does count as a healthy breakfast.  The picture posted on Smitten Kitchen immediately had my stomach wanting the whole thing.  Blah, I don't know what else to say except look at the link on Smitten Kitchen, the pics are amazing, the blog itself is amazing, make the cake. DONE.


6 tablespoons unsalted butter, at room temperature, plus extra for pie plate
1 1/2 cups (188 grams) all-purpose flour (can swap 3/4 cup or 94 grams all-purpose flour with 3/4 cup or 75 grams of barley flour, see Note)
1 1/2 teaspoons baking powder
1/2 teaspoon table salt
1 cup (200 grams) plus 2 tablespoons (25 grams) granulated sugar
1 large egg
1/2 cup (118 ml) milk
1 teaspoon (5 ml) vanilla extract
1 pound (450 grams) strawberries, hulled and halved

Preheat oven to 350°F. Butter a 10-inch pie pan or 9-inch deep-dish pie pan (what I used). I did not test this with a standard 9-inch pie plate but looking at the margin of space leftover in my deep-dish pan after baking the cake, I suspect you’d be safe. This cake would also work in a 9- or 10-inch springform or cake pan. The 10-inch would make a thinner cake than pictured.

Whisk flour or flours, baking powder and salt together in a small bowl. In a larger bowl, beat butter and 1 cup sugar until pale and fluffy with an electric mixer, about 3 minutes. Mix in egg, milk and vanilla until just combined. Add dry mixture gradually, mixing until just smooth.

Pour into prepared pie plate. Arrange strawberries, cut side down, on top of batter, as closely as possible in a single layer (though I had to overlap a few to get them all in). Sprinkle remaining 2 tablespoons sugar over berries.

Bake cake for 10 minutes then reduce oven temperature to 325°F and bake cake until golden brown and a tester comes out free of wet batter, about 50 minutes to 60 minutes. (Gooey strawberries on the tester are a given.) Let cool in pan on a rack. Cut into wedges. Serve with lightly whipped cream.

Thursday, June 9, 2011

Tired of tradtional Lasagna?

That isn't really a fair question, because who tires of lasagna? Pasta, sauce, cheese, meat, these are a few of my favorite things.  With this recipe, when you think lasagna, you have to ask, "Tradional, spinach or BROCCOLI?"  I love broccoli - fiber (duh), it is really green which means it has a lot of nutrients and the great part about this recipe is that it recommends using frozen broccoli florets.  There is one thing I dislike about broccoli - when you bye fresh broccoli, and take the time to slice and dice, the tiny bits of broccoli get everywhere.  Buy frozen - it is just as nutrient packed and healthy as fresh.  RealSimple is true to keeping life simply amazing - enjoy the recipe and check out my comments (noted with ***and then my priceless comment) of where I made small adjustments.


Serves 4| Hands-On Time: 15m | Total Time: 1hr 10m
***I would like to meet these 4 sumo wrestlers because this fed me dinner for 8 nights (paired with a side salad and see other adjustments)

Ingredients

  • 1 15-ounce container ricotta (about 1 3/4 cups) ***I risked using the fat free, aka skim, ricotta and it turned out great
  • 1 pound frozen broccoli florets—thawed, patted dry, and chopped***DO NOT put these on a cloth dish towel because your towel will stink
  • 2 1/4 cups grated mozzarella (9 ounces)***this is kind of an annoying amount because the grated cheese you buy comes in 8oz bags, so I bought one bag and saved a little bit to sprinkle on top - no damage done
  • 1/2 cup grated Parmesan (2 ounces)
  • kosher salt and black pepper
  • 1 16-ounce jar marinara sauce***I will always recommend Prego Traditional, maybe because that is what I was raised on, but I just think it is the best
  • 1/2 cup heavy cream ***I considered skipping this, but decided to follow the recipe and added whipping cream and I really do think it made a difference
  • 8 no-boil lasagna noodles***I admittedly didn't know no-boil existed and bought regular noodles and boiled them, but 8 wasn't enough, will do 12 next time
  • 2 tablespoons olive oil, plus more for the foil
  • 4 cups mixed greens***optional, this is for the salad
  • 1 tablespoon fresh lemon juice***salad

Directions

  1. Heat oven to 400º F. In a large bowl, combine the ricotta, broccoli, 2 cups of the mozzarella, ¼ cup of the Parmesan,½  teaspoon salt, and ¼ teaspoon pepper. In a small bowl, combine the marinara sauce and cream.
  2. Spoon a thin layer of the sauce into the bottom of an 8-inch square baking dish. Top with 2 noodles, a quarter of the remaining sauce, and a third of the broccoli mixture; repeat twice. Top with the remaining 2 noodles and sauce. Sprinkle with the remaining ¼ cup of mozzarella and ¼ cup of Parmesan. ***I needed more noodles because I used a 9x13 inch pan
  3. Cover tightly with an oiled piece of foil and bake until the noodles are tender, 35 to 40 minutes. Uncover and bake until the top is golden brown, 10 to 15 minutes. ***not sure what this oiling the foil business is and I didn't oil my foil because removing a piece of foil covered in hot oil sounded like a bad idea
  4. Toss the greens with the olive oil, lemon juice, and ¼ teaspoon each salt and pepper. Serve with the lasagna. ***toss that salad friends!
I made one addition to this recipe - notice there isn't any meat?! I added italian sausage flavored turkey burger and...IT.WAS.AMAZING!  I recommend adding meat, it just seems right.

Sunday, June 5, 2011

Red Velvet Cupcakes...from Runners World?

Yup, that is right. This recipe was published in Runner's World and it was absolutely delicious (I don't enjoy red velvet cupcakes, but the response was great)!  I guess you can actually forgo the red food coloring because the fusion of buttermilk, cocoa and vinegar creates a red tinge. I used the red food coloring, but am curious to try it without.  A couple warnings - red food coloring seemed to get everywhere and it can stain, don't even think about using regular flour in place of cake flour and yes, vinegar is supposed to be an ingredient.  Finally, add graham crackers to your grocery list because there was a lot of extra cream cheese frosting.  Enjoy!


Cupcakes1 1/2 cups granulated sugar
2 1/2 cups cake flour
2 tablespoons cocoa powder
1 teaspoon baking soda
1 teaspoon salt
1/2 cup vegetable oil
1 cup buttermilk
2 large eggs
2 tablespoons red food coloring
1 teaspoon vanilla extract
1/2 teaspoon vinegar


Cream-Cheese Frosting

8 ounces cream cheese (one bar)
1/2 pound unsalted butter, room temperature
2 cups confectioner's sugar
1 1/2 teaspoons vanilla extract
Heart-shaped cupcake toppers or colored sugar


Preheat oven to 325° F. Line two 12-cup muffin tins with wrappers.

Mix dry ingredients together. Mix wet ingredients together. Pour wet mixture into dry and mix until combined. Fill tins two-thirds full with batter. Bake 15 to 20 minutes. Cool completely.

For frosting, mix butter and cream cheese until smooth. Slowly mix in confectioner's sugar. Add vanilla extract. Frost cupcakes using a piping bag fitted with a star-shaped tip. Or frost with a small spatula. Sprinkle with colored sugar or cupcake toppers. Makes 24.

Saturday, March 5, 2011

Snow = Soup

Just when we thought Spring may, well spring, as we turned March 1 - I am sitting at my desk, watching the rain turn to snow.  And, snow and the feeling of being cold to the bones always makes me want soup.  Many of you know that my wonderful siblings gifted me a Cuisinart slow cooker for Christmas (not that I dropped any hints) and it came with a cookbook, bonus! So, what first...Tomato Soup.  Now, this ins't your traditional tomato soup, but there is an option to puree it, but I left it "rustic" and it was warming and delishious.  Enjoy!

(Source:  Cuisinart Slow Cooker Cookbook)

Tomato Soup

Makes 6 Servings

3 cans (14 oz each) diced tomatoes, juices drained *I didn't drain the juices bc I like my soup soupy
2 garlic cloves peeled, chopped
1 small onion, peeled, chopped *I actually used scallions
1 medium carrot, chopped
1 medium stalk celery, tops removed, chopped
3 cups chicken or vegetable stock
1 bay leaf
1/2 teaspoon dried basil
1/4 teaspoon thyme
*I added cayenne pepper (too much for my taste) and my try chili powder next time - just for a little extra kick

Throw everything in the slow cooker.  My fancy slow cooker has a simmer option, which I assume is "low" - cook for 6 hours and turn down to "warm" (which mine does automatically after I set the timer - again, I love my brother and sister).  Serve as the rustic version or puree in your blender.

I also enjoy grilled cheese and enjoyed my tomato soup with toasted french bread and brie.  Delish!

Friday, February 25, 2011

And we're back...

I have an entire backlog of recipes I need to get on here.  Almost to the point of being overwhelming.  It's kind of like cleaning my house....when I don't keep up with it, it gets too overwhelming, and I don't even know where to start.  So I sit on the couch and watch movies instead. 

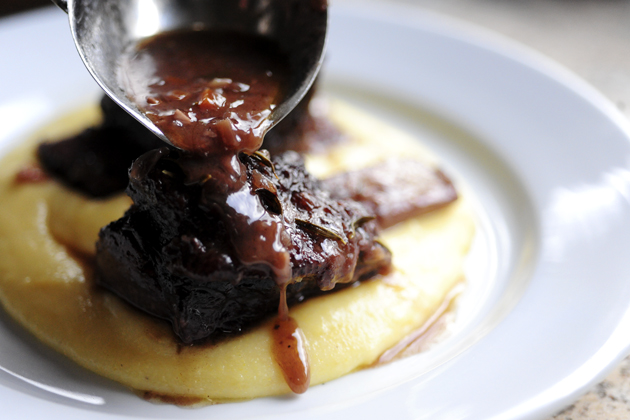
So, I will start with one recipe and move forward.  Because this is just too good not to blog about.  I made this for Valentine's Day dinner, and it did not disappoint.  Seriously, this was weeks ago, and I still drool every time I think about it.  And I tell anyone who will listen...."Have you ever made short ribs?!!?"  And the polenta. Oh, the palenta.  The perfect little bed of heaven for the short ribs.  Quick, run to your dutch oven and make these today!

(recipe and picture source: http://www.pioneerwoman.com/)


Braised Short Ribs

Ingredients

  • 8 whole Beef Short Ribs
  • Kosher Salt & Pepper To Taste
  • ¼ cups All-purpose Flour
  • 6 pieces Pancetta, Diced
  • 2 Tablespoons Olive Oil
  • 1 whole Medium Onion, Diced
  • 3 whole Carrots, Diced
  • 2 whole Shallots, Peeled And Finely Minced
  • 2 cups Red Or White Wine
  • 2 cups Beef Or Chicken Broth (enough To Almost Cover Ribs)
  • 2 sprigs Thyme
  • 2 sprigs Rosemary
(I also added a package of sliced baby bella mushrooms.  I love mushrooms, and thought these were a great addition.  I also used dried spices since I didn't have any fresh ones on hand.  Still tasted great.  Dried spices are more potent than fresh ones, so make sure you adjust the measurements if used dried).

Preparation Instructions

Salt and pepper ribs, then dredge in flour. Set aside.
In a large dutch oven, cook pancetta over medium heat until complete crispy and all fat is rendered. Remove pancetta and set aside. Do not discard grease.
Add olive oil to pan with the pancetta grease, and raise heat to high. Brown ribs on all sides, about 45 seconds per side. Remove ribs and set aside. Turn heat to medium.
Add onions, carrots, and shallots to pan and cook for 2 minutes. Pour in wine and scrape bottom of pan to release all the flavorful bits of glory. Bring to a boil and cook 2 minutes.
Add broth, 1 teaspoon kosher salt, and plenty of freshly ground black pepper. Taste and add more salt if needed. Add ribs to the liquid; they should be almost completely submerged. Add thyme and rosemary sprigs (whole) to the liquid.
Put on the lid and place into the oven. Cook at 350 for 2 hours, then reduce heat to 325 and cook for an additional 30 to 45 minutes. Ribs should be fork-tender and falling off the bone. Remove pan from oven and allow to sit for at least 20 minutes, lid on, before serving. At the last minute, skim fat off the top of the liquid. (Can also refrigerate mixture, then remove solid fat from the top.)
Serve 2 ribs on bed of creamy polenta, spooning a little juice over the top.

Creamy Polenta with Goat Cheese

Ingredients

  • 1 cup Yellow Cornmeal
  • 1 teaspoon Salt
  • 2 Tablespoons Butter
  • 4 ounces, weight Goat Cheese

Preparation Instructions

Bring 4 1/2 cups water to a boil.
Add cornmeal to the water in a thin stream, whisking constantly to avoid lumps.
Reduce heat to a simmer, and cook for 15 minutes, adding salt and extra tablespoons of water as needed.
When polenta is done, stir in butter and goat cheese. Check seasonings, and add salt to taste.

Just a note...leftover polenta just does not seem to have the same texture the next day.  Still delicious, but just not as creamy.  More reason to eat it all up at once!

Cheers, Tanya

Wednesday, December 22, 2010

You know it is Christmas When...

THERE ARE COOKIES EVERYWHERE! 

Below is not only my mom's sugar cookie recipe, but by far my favorite sugar cookie recipe!  I recently made a double batch of these bad boys forgetting that I still have not bought a large cookie sheet, so it took awhile to bake them.  Regardless, I ate a little too much dough and then when I frosted them, I ate a little too much frosting.  I have so many memories decorating these cookies with my family and can't wait to carry on the tradition. Enjoy the cookies, enjoy the frosting, buy colorful sprinkles and enjoy the memories!  Oh, and this is a three day process (Day 1:  make dough; Day 2:  make cookies, Day 3:  frost cookies)

Cookie


1 cup Butter
1 cup Sugar
1 Egg
2 T Cream
1 t Baking Powder
½ t Baking Soda
½ t Salt
1 t Vanilla
3 cups Flour

Cream butter. Gradually add sugar and cream well.  Blend in eggs, cream, powder, soda, salt and vanilla.  Gradually add flour and mix well.  Chill in refrigerator overnight.  Note: we always make a double batch.  Roll out 1/3 at a time on floured surface to thickness of 1/8”.  Cut into desired shapes.  Place on greased cookie sheet and bake at 400 degrees for 5 to 8 minutes-golden brown around the edges when done.

Frosting


1 box Power Sugar (3 ½ cups)
3 quarters of a stick of butter (6 T)
2 t Vanilla
Enough Half and Half to blend frosting to spreading consistency (not too thin)

Mix with an electric beater. Cover cookie and decorate.

We usually decorate at night and let sit overnight so the frosting can harden enough to pack in tins for friends, family and great party gifts...I recommend a small tin of cookies and a fun bubbly if you are attending a party!

Tuesday, November 30, 2010

Who Doesn't Love Brussel Sprouts?!

It is hard not to enjoy brussel sprouts when they are steamed in chicken broth and have bacon bits in every bite.  My Jane (aka my mom) and I were talking about Thanksgiving a couple weeks ago and I said I would prepare the vegetable.  Her immediate response was of course, "I just love brussel sprouts and we never have them. Can you make brussel sprouts?"  My response, "Ugh, Mom, no one likes brussel sprouts and they smell like a fart."  I agreed and was on the hunt...verring away from my trustee cookbooks to one of my favorite sites, williamsonoma.com.  I could not be more happy with this recipe and even better, everyone else enjoyed it at Friendsgiving and again at Thanksgiving with my family.  I really liked that I was able to do a lot of the prep work in the morning, so when it came time to prepare and serve (which is best so they are served warm), it was easy.  I cooked my bacon and then covered the pan and set aside for use during final preparations.  Trust me, braising makes the recipe even better.  I also cleaned and cut the brussel sprouts in the morning, then put back in the fridge.  Follow the recipe and you can't go wrong!  I think the only thing I would have changed for Friendsgiving would be serving them on a platter rather than in a bowl because the presentation really is very pretty, just a little fragrant.

Ingredients:

  • 2 lb. brussels sprouts
  • 5 oz. bacon, diced
  • 4 shallots, finely chopped
  • 2 tsp. finely chopped fresh thyme
  • 1 1/4 to 1 1/3 cups chicken or turkey stock
  • 2 Tbs. unsalted butter
  • 3 Tbs. olive oil
  • 3 tsp. salt


Directions:

Cut or pull off any dry outer leaves from the brussels sprouts. Trim away any brown spots and slice off the dry stem end. Cut the brussels sprouts into quarters. Set aside.

Heat a large sauté pan over medium heat. Cook the bacon until golden brown, about 7 minutes. Using a slotted spoon, transfer the bacon to a bowl. Pour off the fat in the pan and discard.

Return the pan to medium heat, add the shallots and thyme and cook until soft, about 5 minutes. Transfer the shallot mixture to the bowl with the bacon. Pour 1/4 cup of the stock into the pan and, using a wooden spoon, stir to scrape up the browned bits from the pan bottom. Pour the stock over the bacon mixture.

Using paper towels, wipe out the pan and place over medium-high heat. Melt the butter with the olive oil. Add the brussels sprouts and salt and stir to coat evenly. Cook until the brussels sprouts begin to brown, 3 to 4 minutes. Stir again, then cook for 3 to 4 minutes more. Stir in 1/4 cup of the stock. Continue cooking, stirring occasionally and adding more stock as needed, until the brussels sprouts are soft, about 15 minutes more. Add the bacon mixture and any remaining stock and stir to incorporate. Transfer to a warmed serving bowl and serve immediately.

Sunday, November 21, 2010

Leftovers

Good Morning Friendsgiving-ers! As I prep my kitchen to embark on my delicious goodies for tonights feast, I remembered that I wanted to share a little tidbit with everyone as we not only prepare for the feast, but also, look forward to the leftovers.  This isn't a joke and I am aware that it actually sounds like Tanya and I are the new hosts of the Delicious Dish....but I found the best tupperware!  As I continue to spillproof my life, I invested in (a whole $3 for 3) Ziploc tupperware with a screw on top.  It is fantastic and I highly recommend that anyone that has experienced a salad dressing leak in their work bag or maybe wanted to bring homemade soup but were nervous it would spill, etc.  They are fantastic and house many leftovers in my fridge/freezer!

Wednesday, November 17, 2010

Fish for the Non-fish Eaters

I could kick myself for not taking a picture of dinner tonight.  I have to remember that I am now a food blogger, and with that comes a certain responsibility (i.e. snapping a pic or two before I devour my food).  You'll have to forgive me; hunger won out tonight.

Anywho, on to the recipe.  Dinner tonight was Broiled Tilapia Parmesan (recipe source: allrecipes.com). I can't remember the first time I made this, but I can tell you that it turned my skeptic of a husband into a fish eater.  The good thing about this recipe (other than the fact that you can have it on the table in 10 minutes) is that you can really mix and match the spices to your taste, and you really can't go wrong.  I never have celery salt on hand, so I omit that.  Sometimes I don't have lemon juice, so I use a bit of white wine vinegar.  Sour cream is subbed for mayo, and on and on. You get the idea.  Just don't forget the parmesan!

We had the fish with some roaster acorn squash. And sadly, no wine was shared tonight.  Don't worry, there is always tomorrow!


Broiled Tilapia Parmesan

Ingredients

  • 1/2 cup Parmesan cheese
  • 1/4 cup butter, softened
  • 3 tablespoons mayonnaise
  • 2 tablespoons fresh lemon juice
  • 1/4 teaspoon dried basil
  • 1/4 teaspoon ground black pepper
  • 1/8 teaspoon onion powder
  • 1/8 teaspoon celery salt
  • 2 pounds tilapia fillets 
Directions  
  1. Preheat your oven's broiler. Grease a broiling pan or line pan with aluminum foil.
  2. In a small bowl, mix together the Parmesan cheese, butter, mayonnaise and lemon juice. Season with dried basil, pepper, onion powder and celery salt. Mix well and set aside.
  3. Arrange fillets in a single layer on the prepared pan. Broil a few inches from the heat for 2 to 3 minutes. Flip the fillets over and broil for a couple more minutes. Remove the fillets from the oven and cover them with the Parmesan cheese mixture on the top side. Broil for 2 more minutes or until the topping is browned and fish flakes easily with a fork. Be careful not to over cook the fish. 
Cheers,
Tanya

Sunday, November 14, 2010

Sloppy Joe, Slop Sloppy Joe

I recently purchased an amazing cookbook in the Willams-Sonoma collection called Comfort Food Warm and Homey, Rich and Hearty.  What I love about this cookbook is that the recipes are old favorites or the foods that remind me of my mom's cooking, with a little twist.  Last night's dinner contained two recipes from Comfort Food, the main course being Sloppy Joes, with Coleslaw and Potatoes on the side. My mom used my Grandma Edie's Sloppy Joes recipe, which is actually the base of the WS version, and Tanya confirmed that her everyday version is also very close.  Somehow, WS managed to make an everyday favorite just a little bit better without any extra work...just a couple more ingredients.  Enjoy the recipes for Real Sloppy Joes and Creamy Coleslaw.  We aren't going to talk about the potatoes - they were an experiment that were still not as good as my mom's but it takes a lot to mess up potatoes, so we still ate them...and I ate the leftovers for breakfast!

Menu:  Baked Brie and crackers, then Real Sloppy Joes, Creamy Coleslaw, baked potatoes and Robert Mondavi Cabernet Sauvignon.

Real Sloppy Joes

Ingredients:

  • 1 Tbs. canola oil
  • 1 yellow onion, diced
  • 1 celery stalk, diced
  • 1/4 cup finely diced green bell pepper
  • 1 1/2 lb. ground beef
  • 1 cup tomato sauce
  • 1/2 cup ketchup-style chili sauce
  • 1 Tbs. Worcestershire sauce
  • 1 Tbs. Dijon mustard
  • 1 Tbs. cider vinegar
  • 1 Tbs. firmly packed light brown sugar
  • 1 tsp. kosher salt
  • 1/4 tsp. freshly ground pepper
  • 6 sesame-seed sandwich buns, split

Directions:

In a large fry pan over medium heat, warm the oil. Add the onion, celery and bell pepper and cook, stirring occasionally, until the onion softens, about 5 minutes. Add the beef, increase the heat to medium-high and cook, stirring and breaking up the beef with a wooden spoon, until it is no longer pink, about 10 minutes. Stir in 1/4 cup water, the tomato sauce, chili sauce, Worcestershire sauce, mustard, vinegar, sugar, salt and pepper and bring to a simmer. Reduce the heat to medium-low and simmer, stirring frequently, for about 20 minutes to blend the flavors.

Toast the buns. Place the bottom halves of the buns, cut side up, on warmed individual plates and top with the beef mixture, dividing it equally. Cover with the bun tops and serve immediately. Makes 6 sandwiches.

Joanne's Comments:  I would cook the beef until it is still a little pink, then drain the fat off. I bought pretty lean beef and there was still a significant amount of fat that then settled on the top of my finished masterpiece.  After draining, simmer with the cooked veggies until beef is cooked through.  Also, Chili Sauce was a new ingredient to me, so I wasn't quite sure what I was in for.  If this is new to you too, Chili Sauce is not spicy and was in the ketchup section at the grocery store. 

Loved the Sloppy Joes!  I think next time, I will also add kidney beans, like my Grandma's Sloppy Joes.

Creamy Coleslaw (I can't find the link on WS.com)

Ingredients:
  • Green Cabbage, 1 head (about 2 pounds)
  • Celery, 2 stalks
  • Granny Smith apple, 1 
  • Yellow or red onion, 1 small
  • Carrots, 2 small, peeled
  • Cider vinegar, 2 tablespoons
  • Fresh flat-leaf parsley, 2 tablespoons minced 
  • Mayonnaise, 1 1/4 cups
  • Kosher salt and freshly ground pepper

Directions:

Cut the cabbage into wedges through the stem end, and cut out the core.  Using a food processor or a stand mixer fitted with the thin slicing attachment, slice the cabbage into thin slivers.  Transfer to a large bowl.  Slice the celery with the slicing disk, and add it to the cabbage.

Replace the slicing attachment with the shredding attachment.  Halve and core the apple but do not peel.  Cut the apple and the onion into wedges.  Shred the apple, onion, and carrots, and add to the cabbage and celery.

Sprinkle the vegetables with the vinegar and toss to coat evenly.  Add the parsley and mayonnaise and mix well.  Season with salt and pepper.  Cover and refrigerate until chilled, at least 2 hours.  Taste and adjust the seasoning with more vinegar, salt and pepper before serving.  Serve cold.

Joanne's Comments:  If I had read the directions, I may not have tried this recipe for the sole reason that I don't have a food processor.  Since I had a head of cabbage, I figured I would give it a whirl.  I am not sure what the first direction for wedging a cabbage really means, so I just kept cutting chunks off and slicing them the way I felt coleslaw should look like.  Using the same knife, haha, I sliced the celery as thin as possible, then using my cheese grater, grated the onion and apple.  I then peeled the carrots and then just kept peeling the carrot into the bowl.  I also used parsley from my spice cabinet, but I am sure fresh would be pretty nice too.  Luckily, I decided to make this early in the afternoon, so I succeeded in chilling it for about 2 hours and it tasted great!  It was a yummy pairing to the sloppy joes.

Also, I apologize, I couldn't figure out how to add a picture, but I promised it looked exactly like the picture in the link on WS.com.

Hooray for Cooking with Drinks!

We are your hosts, Joanne and Tanya and our specialty is...balls.  Welcome to our blog, which we launched to share recipes that we found on one of the millions of fantastic cooking blogs or takin' it old school....from a cookbook.  Neat.  Tanya is definitely going to be the one to watch for recipes across blogs and Joanne is cooking her way through her cookbooks, but don't worry, we mix it up.  Good times.  Enjoy our triumphant successes, dinner parties, everyday favorites, and most importantly, our epic failures...while enjoying the finest cheap wine we can get our hands on!